


Making of: Braille Dice
- Guild Master Jess
- Oct 28, 2018
- 10 min read
Updated: Jan 16, 2021
2020 Update: different aspects of this process have changed over the years, though it is largely similar. We now print dice at a different orientation and grouping on the print bed to optimize space and time. Cleaning and curing is a little bit different with new equipment acquired to speed up this process. Sanding is still done by hand, as is the gloss spray for finishing. We are still using the Anycubic Photon for all prints and now have two machines.
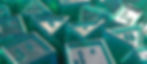
DOTS braille dice have come a very long way since their original design in 2017. With different kinds of feedback, we've redesigned them a few times to help improve the experience of the visually impaired user. This latest design was finalized in March 2018, and is the model you will find available for download on our site, and for purchase from Shapeways already printed. The sales from Shapeways are not marked up in any way, meaning we don't get any profit from those purchases which is exactly how we want it! Like many other charities, we'll be looking to make our profits necessary for operation through donations and various merchandise sales, instead of the accessibility friendly items people are coming to us for. That being said, our long term goal is to be able to offer them for sale ourselves, at a lower price point than Shapeways (which is currently about $60 for a full seven piece RPG set) to help make them even more accessible. We have the ability to do that in the near future thanks to an extremely generous donation a few months ago to acquire a better printer! Printing with resin on the $500 Anycubic Photon SLA Printer, our cost is a fraction of what it is for Shapeways, who are printing the dice through a very different process on their nylon based industrial printers that are worth many of thousands of dollars, some of them even crossing the one million dollar mark. Where their cost of printing and processing comes in at about $60, I can safely say that ours looks to be closer to $30 for a seven piece RPG set! I'm still working on the exact numbers and it may change if we can get different deals on the printer resin, but hopefully that $30 price point will be the highest it will be. I'll know more in the coming months as more sets are printed and worked on, and see what we can do early next year. One thing to always keep in mind though is our dice printing is a one woman operation, on one machine, in my free time. I will never be able to turn things out at the speed and perfection of a professional printing company, but I'm happy to do whatever I can! Without further ado, here's the behind the scenes look at how these dice are brought to life:
Note: I've manually added many different hyperlinks in this post with more information about 3D printing processes, companies, and other things. They're not ads from other companies like other blogs sometimes have. Click them and enjoy the additional info!

The first part of any 3D printed item is the file itself. Our dice have all been modeled by Sterling Pittman, a good friend of Jack's. I take his STL files and import them into the printer's program for setting up support pieces. Note that what works for me may not work for you, but it may be a good starting point if you're looking to print on your own. It took quite a lot of trial and error (with many failed prints!) to learn the best way to work with resin and this specific printer. It turned out to be safest to put all of the supports on the flat raised edges and braille dots themselves, making sure none of the supports touch the tactile orientation edges since it would accidentally destroy or blend those dots together. There are also never any supports on the recessed faces since it was harder to remove and clean that surface, and ended up interfering with reading the braille. Dice orientation on the build plate proved important as well, since the Photon traditionally has trouble building flat things that are completely vertical and works better when they're at an angle. My orientation and supports for each die is as follows:
d4: Stand up vertically on curved edge, then tilt to one side 45°. Supports at the bottom of curved edge and on the die face pointing towards build plate on each braille dot and supports around face's raised edge
d6: Tilt on edge 45° so die sits on a complete edge (not corner point). Supports on the bottom edge, all braille dots on both die faces pointing towards build plate, and around those face's raised edges
d8: Stand up on corner point with orientation edge around the horizontal middle. Supports on all braille dots for 4 bottom die faces, all raised edges, and 4 corners at die's middle.
d10/d%: Stand up on corner point with orientation edge around the horizontal middle. Supports on all braille dots for 5 bottom die faces, and all raised edges
d12: Stand up on a face's edge that allows orientation edges to be on the left and right sides of die (as opposed to top and bottom). Supports along any face that is below the halfway point, on all braille dots and raised non orientation edges
d20: Stand up on corner point with two orientation edges around horizontal middle. Supports on all braille dots for bottom 5 faces, and 5 alternating faces around the middle
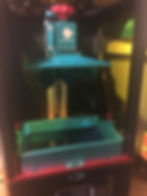
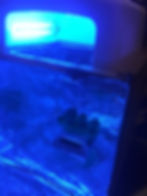
The easiest part of this entire process is putting the file on a USB drive, sticking it into the printer, and clicking print! SLA resin printing is a pretty cool process, using UV light to cure liquid resin. The resin is in a metal vat with a clear plastic film bottom that is resting on an LCD screen. One layer at a time is cured for a few seconds, printing every die at once. The build plate then moves up a fraction of a millimeter and the next layer is cured, repeating this for all layers (the set of 7 dice is about 800 layers). Formlabs has a very in depth explanation of how SLA printing works that's a really awesome read if you're curious about the ins and outs of all of it. A nerve wracking 4 hours later, I find out whether the print was successful or not. There are any number of things that can make a print fail, the primary of which being problems with the resin. If there are leftover parts from a previous print, or too many bubbles from pouring in the resin, it may not create the support pieces correctly which then causes an entire die to fail. The good thing is when this happens, it usually only messes up one or two pieces, so I still get something usable out of the print. Comparing this to the filament printer I was using previously that took close to 12 hours to print the same items, if there's a failure at any point it destroys the entire set more often than not. The difference there is I can watch every layer be put down, and stop it immediately if there's a problem. With the resin printer, I can only see it when it's up above the edge of the vat, at about 75% completion.
When the print is completed, I remove the build plate from the printer by loosening the red knob shown in the previous picture, and pulling the entire blue piece off. In the above picture, I'm holding the Anycubic logo cube and looking at the underside, where the dice were hanging upside down. I check closely for any failed pieces, which determines whether or not I need to clean out the vat of resin. If nothing failed, I can just add more resin to begin the next print. If pieces have failed, I need to remove everything and go through a full cleaning. This means pouring the leftover resin through a filter to get any tiny pieces, carefully scrape off or use isopropyl alcohol (IPA) to clean the film on the bottom of the vat, removing any cured pieces that may be stuck. At this point, the dice themselves look a little goopy (technical term) and messy because they still have uncured resin on them. The braille is almost unreadable on some areas due to the extra liquid on each face.
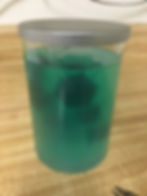
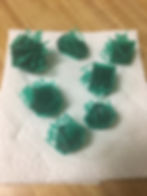
The cleaning process is something that's fairly straightforward, but I ended up refining to see what produces the best results for this item with this resin (specifically the Anycubic brand translucent green, which is all I use). Websites and forums had suggested to do a two part cleaning, first with IPA and then with water. I found the water made the dice very cloudy, so I've removed that from my process. Right off the printer, I stick the entire piece with supports and base in 91% IPA that starts out clear, but turns green with resin after some use. It soaks for 10 minutes or so, then gets removed and lightly dried. Previously, I would remove the support pieces before IPA cleaning, but it was very messy and didn't produce any better results than doing it after. Now, I wait to remove them until after post curing, which is the next step.
Even though the UV light is curing the liquid resin into a solid object, they're still soft enough to be dented by a fingernail. Many people recommend additional curing with UV light to improve item quality. While there are units that are made to do this, they're often a few hundred dollars. There was no way I was getting something that was the cost of the entire printer itself, especially when there's a DIY option! I got a fairly cheap nail polish curing lamp that has worked wonderfully, along with some solar powered jewelry displays that rotate when under the UV light. With a box and some tinfoil, I was ready to go for about $30. I can fit two sets of dice in here at once if necessary, but I often just do the one since I'm printing one at a time. I leave them to cure for about an hour usually which is over the suggested time, but it never hurts to do more.
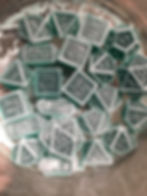
After time in the UV box, the dice are ready to be finished. I use a flush cutter style of pliers/clippers to remove all the supports from the dice. The flat edge on the side of the pliers slides nice and evenly across the printed base, allowing me to remove the supports easily. At this point I'll make sure the bottoms of the dice are also cured fully, putting them back in the box if necessary and using the supports to balance them at different angles to get every piece cured.

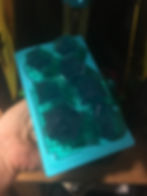
The flush cutter is also extremely useful when it comes to removing the supports from the dice themselves. It's easy to use that flat side on the edges, and line up with the braille since they are at the same height. Everything is still very rough at this point (as seen on the edges of the bottom most d10 in the above picture) with small bumps everywhere there were previously supports.
Removing support leftovers and evening out the dice is an easy, but time consuming process. I sand every face with a large nail file, making sure there are no stray bumps and the braille is perfectly level with the face's raised edges. This helps the dice roll as fair as possible, with no extra pieces sticking out to interfere with the balance or rolling on a surface. The dice get another IPA bath and thorough toothbrush scrubbing after sanding to remove all the dust. The look of these being sanded is what inspired me to try the hand painted ones! Those will probably be specialty pieces that we'll sell for a bit more, but they're low priority right now.
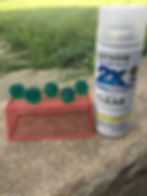
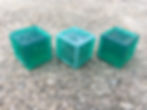
After sanding, some of the dice ended up a bit cloudy again so I wanted to give them more of a finished look. I recently tried a clear high gloss spray paint, and loved the results! Bonus is that it's UV resistant, so it helps prevent any loss of resin color (which can happen over time if this green resin is kept in lots of sunlight) or any other possible changes to this UV reactive material. Spraying outside because fumes are bad, I do them in various stages depending on the number of faces, allowing the paint to dry completely overnight. Some of the early attempts with these ended up not so great as I sprayed too much gloss on them and it interfered with reading the braille. The end result is a very nice, gem like finish that looks professionally made! It also feels much smoother to the touch than the original resin, which will hopefully be nicer to use.
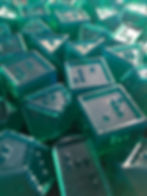
When all is said and done, it's close to 24 hours before they are completed. Between cleaning, curing, sanding, cleaning, and final gloss, there is a lot of work that goes into these after they come off the printer to make them the best they can be. The braille dice are wonderful, but they're not perfect, precision pieces. You can see the lines in the picture above that are on the recessed faces of the dice (this is a product of the printer, and isn't able to be felt in use). Some of them have bubbles here and there (that can be seen on the edge of the d6 on the left of the picture above), some will get a little extra gloss, some may have other minor imperfections. They wouldn't pass anything like a casino quality test, but they are just as fair as your average Chessex die. In the end, we're not in this to make casino dice, we're in this to provide an item that has long been sought after, and not very reliably or easily found with various failed kickstarters or poorly designed items by others. We're happy to give out the files for free, make printed items available for purchase through Shapeways, and now aspire to make those printed dice even cheaper to get through us. Producing these dice are absolutely a labor of love, but one that is very much enjoyed! It feels great being able to make things that people need and love to use, and help give visually impaired gamers back their independence at the table. There's nothing like that feeling of rolling a nat 20, and being able to find that out on your own is the best. Enjoying that brief moment of knowing before everyone else does makes it that much sweeter! I'm happy being able to work on the DOTS RPG Project and help bring such positive change to the gaming community. Maybe one day, these dice and our mission will change the world :)